
Thursday, September 6, 2012
Sunday, August 26, 2012


Saturday, August 25, 2012


Friday, August 24, 2012
A Poem by Jorge Luis Borges
You Learn
After a while you learn the subtle difference
Between holding a hand and chaining a soul,
And you learn that love doesn’t mean leaning
And company doesn’t mean security.
And you begin to learn that kisses aren’t contracts
And presents aren’t promises,
And you begin to accept your defeats
With your head up and your eyes open
With the grace of a woman, not the grief of a child,
And you learn to build all your roads on today
Because tomorrow’s ground is too uncertain for plans
And futures have a way of falling down in mid-flight.
After a while you learn…
That even sunshine burns if you get too much.
So you plant your garden and decorate your own soul,
Instead of waiting for someone to bring you flowers.
And you learn that you really can endure…
That you really are strong
And you really do have worth…
And you learn and learn…
With every good-bye you learn.
Thursday, August 23, 2012
BBS 8.0 - Yosamitesa
The starting F8 was "Thing 1 and Thing 2" from Dr. Seuss.
I'm not sure what to call the block - maybe Pinwheel Weave?

Monday, August 20, 2012
BBS 8.0 - Moonrise
I'm a member of QuiltingBoard.com and frequently participate in the swaps.
I've got quite a few getting ready to start and today I got my first package for the Boomerang Block Swap 8.0.
The basic premise is this:
Each member sends every other member a fat eighth (F8) of fabric.
A F8 measures approximately 11" x 18".
Using that F8 and their own added materials, each member makes a block of their own choosing and sends it back to the original sender.
You can request certain colors or styles of fabrics but you cannot request a certain style of block.
All blocks must be 12.5" when mailed back.
This is the fabric I got in the mail today:

And this is the block I'm mailing back tomorrow:

The pattern is called "Paths & Stiles."
I'm trying not to let the fabric sit around since I've got time to work on the
blocks now. A week from today (when school starts back up) my schedule is going to be considerably more crowded - so I'm doing what I can while I can.
A Second Cutting Tutorial
So, remember this tutorial about how to cut?
I mentioned that I had a method for cutting pieces larger than your ruler.
Allow me to demonstrate that method.
I'm jumping to the point in the last tutorial where you had already ironed the fabric, folded it selvage to selvage and creased the bottom, and squared up one side of the fabric.
I have also already done the flip/rotate maneuver so that my squared edge is on my left hand side.

Now, I needed to cut a 17.5" wide strip.
The problem? My ruler is 8.5" wide.

The solution is to use 2 rulers.
What I do is this:
First, start with the math. In this situation, I have an 8.5" wide ruler. I need a total of 17.5".
So, 17.5" - 8.5" = 9".
I take a second ruler (in this case, it's my 15" square ruler) and line it up on the squared side of the fabric.

*A note: when you are using 2 rulers, it really only matters if one is the full length of the fabric. In this case, the 8.5" ruler is going to be my "cutting" ruler.
So, now I carefully position my 8.5 x 2" ruler against the 15" square ruler.
Make sure there are no gaps between the rulers.
Double check you are still perfectly lined up on the squared edge of the fabric.
At this point, you can remove the first ruler (in this case, the 15" square ruler) and focus on the cutting ruler.
Now my cutting edge is at the measurement I need and I can finish cutting the fabric with my rotary using the technique I demonstrated before.

I have found that the key to using this method is to make absolutely sure your rulers are not slipping around on the fabric.
This, especially, is where those True Grips circles come in handy. (You can see them all over the place on both my rulers).
Remember, take your time to line things up correctly. If things don't look right, pick the rulers up, walk away, and try again in a few minutes.
It's a pain to mess up a 1.5" strip. It's a gigantic catastrophe to mess up a 17" or 21" or 36" strip.
Sunday, August 19, 2012
A Pinterest Win!
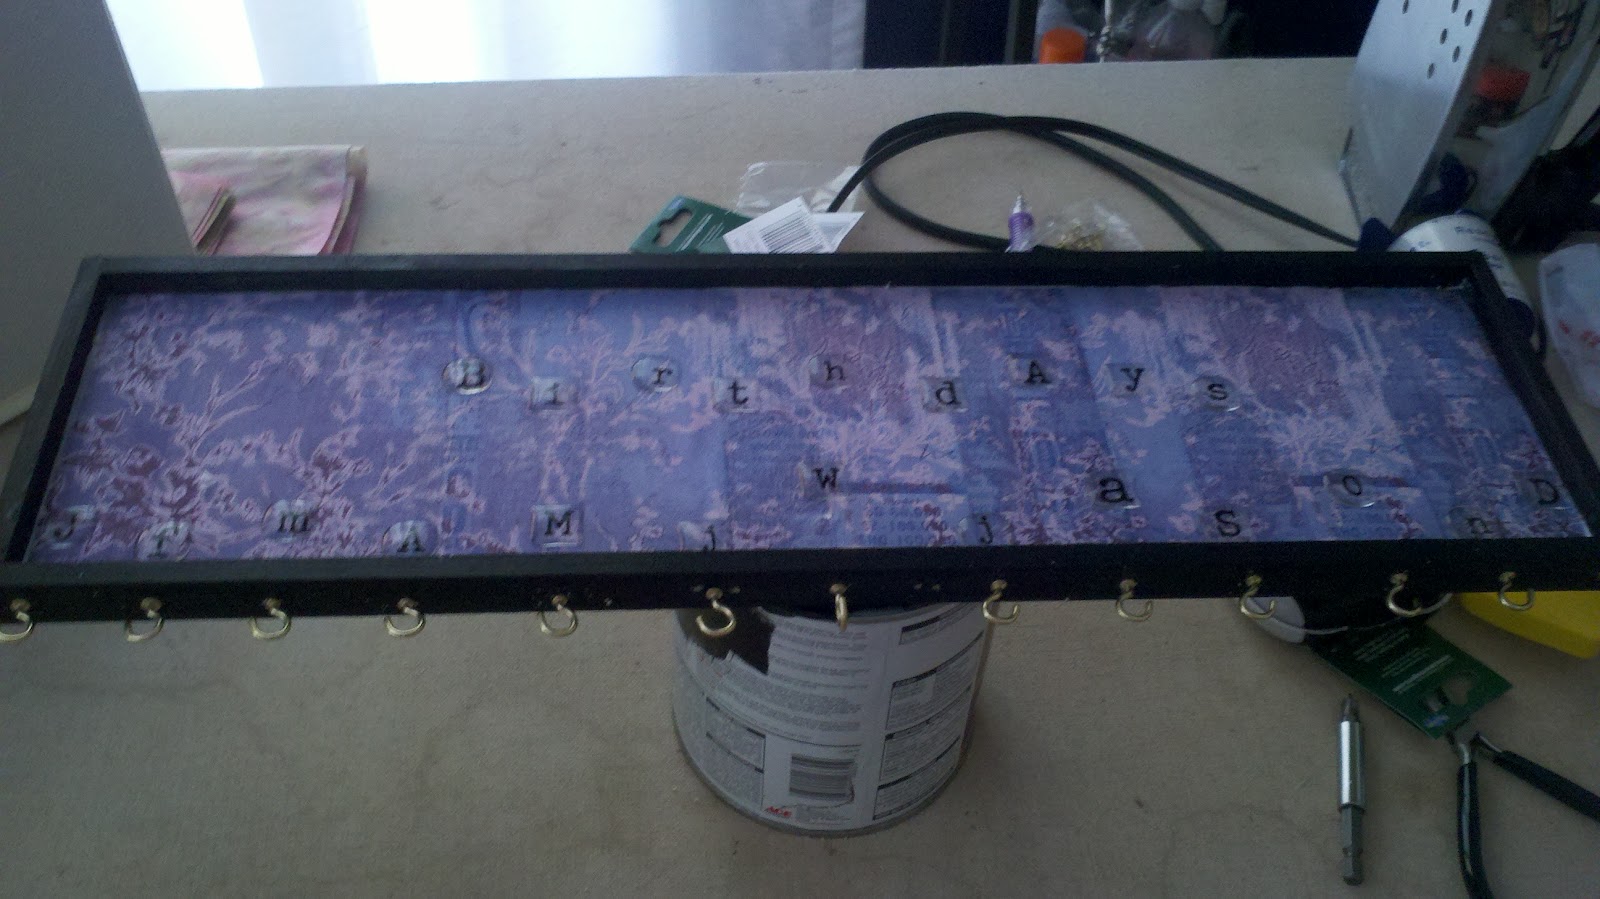
So, based on this pin on Pinterest (click to follow me), I made my own birthday board dangly tracker thing.
Yes, that's an official name.
I started off at Michaels. I found a wooden board that was more or less already framed for about $4.99. It even had hangers on the back.
So I painted the frame part with black high gloss.
I cut some scrap book paper to fit inside the "frame" part of things and glued it down with Elmers. I had some trouble with the paper buckling up around the edges. I just kept pushing it down and eventually the paper gave up fighting back.
I predrilled 13 holes at the bottom. Why 13? We'll get there.
In those holes, I screwed in little gold screw hook things. I made the first six point one way, the middle points forward, and the last six point the opposite direction as the first six.
Then, I stuck letters for each month above the hooks. If I had been thinking a little better, I would have stuck the stickers first and THEN drilled. Why? The spacing is a little uneven, to say the least.
And then I put stickers across the top saying "Birthdays."
Now, for that 13th hook: I made a spot in the center (between June and July) to hang people we're waiting on. As in babies that haven't quite made it out yet. I put a "W" at the top... for waiting.
I couldn't find any circular (or even different shapes) that would work out, so I bought a 1" circular paper punch and punched holes out of scrap book paper.
I used a tiny pin-hole punch to make a hole at the top and bottom of each circle. I wrote names and dates (numbers only) on each tag and then connected them using oval shaped jump rings.

Doogie said, "What a great idea. Now I know who to send cards to."
Yes, because I know he spends SOOO much time stressing out about when everyone's birthday is about to happen so the cards can get in the mail on time.
Including the tools I had to buy (those freaking punches are expensive!!! I know why Martha Stewart is so damn rich!), the total cost for this project was probably in the $40-$50 range. But, if I were to make another as a gift or something, I'd only have to buy another wooden board.
I am considering adding in important anniversaries and putting them in some kind of contrasting color. But then, the only anniversary I really give a crap about is my own and I already know that date.
Sunday, August 5, 2012
I'm not the only artistic one in this family
Midget won ribbons at the 2012 Montana State Fair!
First Place: Midweek Original Design

Third Place: Midweek Modified Kit

Super Awesome Midget!

Wednesday, August 1, 2012
A (Different) Wedding Quilt
A friend and I are splitting the block construction for this quilt.
Here's the math:
25 blocks
1 block = 9x9 grid = 81 squares
That is 2,025 2" squares to cut, fuse, and sew.
Thankfully, we're using QuiltFuse.
It has built-in grids.
Here are my first 3 blocks (fused, not sewn):


Tuesday, July 31, 2012
Wedding Quilt Finish
I've been putting off binding this quilt for almost a month now.
I don't enjoy the binding process because I generally end up with scratches and bleedy spots all over my hands, arms, and chest.* It's not a pleasant shower to take after binding.
But this quilt was staring at me and starting to get a little belligerent when it talked to me... "Hey stupid, I'm not doing any good on your floor."
Alright then.

*I use my machine for all the binding and I pin it to death before I step a foot onto the pedal. I feel like I'm giving the user a better shot of not destroying the quilt or requiring repairs if it's machine-sewn.
Bella Verona BOM - Blocks 6 & 6.5
Bella Verona BOM - Blocks 6 & 6.5
"Two-Patch Tiles" (8)
&
"Courtyard Tiles" (20)

Sunday, July 29, 2012


Saturday, July 28, 2012


Thursday, July 26, 2012

Wednesday, July 25, 2012
Semi-Epic Work Stoppage
As I finished putting binding on little Miss Gummi Bear's quilt, I thought to myself,
"Hey, I can do a project for myself now."
Awesome thought.
So I go about digging through the on-deck project pile and decide to work on my Bella Verona BOM kit. Except mine isn't really a BOM because I got it all at once to save on shipping costs. But I'm treating it like a BOM. Or maybe a BOW. Truthfully, maybe I can make it a BOD, but I don't want to set myself up for failure there.
Which brings me to the work stoppage part of the evening:
I am experiencing a serious lack of appropriate color thread.

Damn the man.
Basic Cutting Tutorial
A Cutting Tutorial
(For LauraBean)
First: I always use Mary Ellen's Best Press. There are a million smells. Cherry blossom is the only one that doesn't make me sneeze uncontrollably and get a snotty nose. To be fair, I haven't tried the unscented version but I like the smell.
The major benefit of using this over traditional starch is that if you over-spray or saturate an area, when it comes time to iron there isn't a white caked up flaky mess.
And it smells good. So.
I haven't found it at any Joanne's.
You'll probably have to hit a legitimate quilting store to find it.

So, the first step is to take your fabric and open it up. Spray it with your starch. I have my own "big board" so I can fit almost 2 yards of fabric (lengthwise) and from one selvage to the factory fold.
The key here is to get rid of the factory fold.

Press the fabric so that it is smooth from selvage to selvage.

Now, take your nicely pressed fabric and line up the selvages. The sides (where it was cut at the store) might not line up; you can see I've got almost an inch of difference. It's ok. We'll fix that in a bit.

Now, press your new fold. It may or may not mirror the factory fold (not that you can see it now that you've pressed it into submission). You can see where I've pressed half the fold (it's flat) and where I haven't pressed yet (the right side).
When you do this fold-pressing, you want it to look like the left side: when you go to square things up and cut, if it isn't pretty darn flat, it will mess up your measurements.

I am right-handed, so I begin by squaring up my fabric on the right side of my mat. I also tend to use a wide ruler (this one is 8.5" x 24").
You cannot see them, but I've also got about 10 True-Grips circles on the bottom of the ruler. I'll talk about why in a second.

So, take your freshly pressed fabric and lay it on the mat with the fold by you, selvage away from you.
Try to center it on the mat if it makes you happy, but that isn't as important as making sure the fabric is on the mat and not hanging off.

So now you're going to put the ruler on your fabric. Pick a measurement within the bottom inch (by you) and align it with the fold in your fabric.
THIS PART IS VERY IMPORTANT!!!
If you don't make sure your bottom fold is aligned with the ruler, your fabric cuts won't be square, straight, and true.

Take your time and make sure you've got things lined up nicely.
I can't quite figure out how to rotate this picture, but you can see that my fold is lined up with the 1/2" measuring dots all the way across.

This is where those True-Grips come in handy. I place my hand centrally on top of the ruler; the grips hold the ruler to the fabric and keep it from sliding around.
NOTHING will piss you off more than having your ruler slip mid-cut.
Trust me.
Notice my fingers are all inside the bounds of the ruler. Believe me when I say it really hurts to cut yourself with a rotary.
If you're really worried about slipping and cutting yourself, get a kevlar glove. I haven't seen any at the quilting stores, but I know kitchen supply stores have them for people who shuck oysters and dismember meat.

You are going to place your rotary blade at the bottom of your fabric and butt it right up against the ruler.
I use my left hand to push down on the ruler and provide a stable guide for the rotary to roll against. Keeping the blade pressed against the side of the ruler, push up with the cutter until you are clear of the fabric.
I have found that I can feel if the blade doesn't go thru all the fabric. If you think this has happened (or you're not sure and want to be positive), make a second pass with the cutter.
Just be sure not to move the ruler or it will destroy the cut you just made.
KEEP YOUR HAND ON THE RULER and put the cutter down.
Use your right hand to move away the excess fabric you just cut (the stuff NOT under the ruler). It should move away freely and easily.
If it doesn't, then your cutter missed a spot. Keeping your hand on the ruler, pick the cutter back up and carefully go over the spots you missed.
As a note: if this is happening a lot, it might be time to change your blade. With a new blade, it will feel easier than cutting melted butter. When you have to labor to cut the fabric, the blade is dull or chipped and needs to be changed.
When you have successfully trimmed the edge off (and taken your hand off the ruler), it will look like this:

This part is where my personal preferences tend to veer away from how other people cut fabric. I can't promise my method is better, but it makes a whole lot of sense to me.
While my ruler is still in place (like the picture above), I fold over the fabric that was off to the left side of where I was cutting so that it's entirely on top of the mat (and ruler).

And I rotate the entire thing 180 degrees so that the ruler and cutting-side is now on my left and the fold is up at the top of the mat (away from me).
I put the excess fabric off to the right hand side now so that it's out of the way.

Now we are going to cut a specific width of fabric. I need 3" strips. So now I line up my freshly cut edge with the 3" mark.
Lining this up is the same as when we lined up the fold with the 1/2" marks earlier. You want to be as precise as possible and make sure the fabric hits the lines up and down the ruler. (I couldn't get a better picture of this because of glare issues).
This will seem very no-duh, but when you are doing something that isn't a whole-inch measurement (like 1.5" or 2.75") make sure that you're using the correct measuring line from top to bottom. When I first started quilting, I had quite a few mis-cuts because I would be at the correct mark on the bottom of the ruler and using an entirely different measurement at the top. So double check. You know, measure twice cut once etc etc.
So, just like before, my hand is on the middle of the ruler and I'm cutting with my right hand.

Just like before, I keep my hand on the ruler until I've moved the excess fabric away with my right hand. I try to do this carefully so that the layers still stay aligned.
Now, the benefit (to me) of cutting this way is that I have control over the fabric I am actively cutting. Clearly this method isn't going to work for pieces larger than my ruler, but I have a few techniques to bypass that issue (that I can do a tutorial on later).

Now I'm going to show you what happens when you didn't take the time to make sure your fold was aligned correctly.
I deliberately didn't align the fold properly when I made my first straight cut.
Now, I've rotated the mat and I'm ready to cut a strip that is 2" wide. You can't see it, but the ruler aligns with the 2" measurement all the way down the side.

I've made the cut and laid out the 2" wide strip. It looks entirely correct.
BUT.

When I press the strip open, you can see that the strip is not straight.
I put a sheet of paper near the edge so you can see how the strip bows down from the center fold. It isn't straight now that it's open. I've seen this referred to as a "v cut" because of the shape of the opened strip.
The easiest and most reliable way to avoid a v-cut is to take the time to align your fold before you make the very first cut.

To recap:
1. Press with starch.
2. Make your own fold and press it really well.
3. Take your time and align the fold correctly before cutting.
4. Keep your fingers out of the way of the cutter.
5. Take your time.
6. Take your time.
7. Take your time.
Tuesday, July 24, 2012
FQS 2012 Mystery Designer BOM - June & July
June - Block 1
"Laundry Days"
By Anne Sutton

July - Block 2
"Mint Julep"
B Lisa Bongean

Monday, July 23, 2012
Monday Finishes (and Starts)
I finished the Spring '12 Mystery Quilt (the Original) and got the binding on today. I couldn't bear to go to bed knowing there was even a second of work left to do on it... including the label.


Now it's ready for the birthday girl.
And rather than go to bed (like a normal person), I HAD to start something new.
Thus, I dig out my Fat Quarter Shop Mystery Designer 2012 BOM #2.
It's cut, partially pieced, and ready to be completed tomorrow.
(Maybe I can do the #1 block tomorrow, too)

I am beginning to notice a trend of "mystery" being involved in my quilt projects.
Maybe it's my way of giving up control? (hahahaha)
Subscribe to:
Posts (Atom)